
-
Home

-
Troubleshooting
- 13.20.00 Jam in Top Cover Area Error on HP LaserJet 4200 or HP LaserJet 4300 series
13.20.00 Jam in Top Cover Area Error on HP LaserJet 4200 or HP LaserJet 4300 series
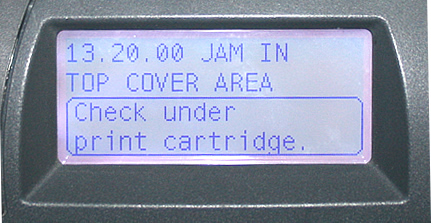
If you see this error code 13.20.00 "Jam in Top Cover Area" on either an HP LaserJet 4200 or HP LaserJet 4300 series printer, the printer either has a sensor blocked or it has an incorrect model fuser installed.
The most common area for paper to jam is underneath the toner; first pull your toner cartridge out and verify there is no paper stuck in that area. If that area looks clean, you can take a thin cardboard (like a manilla folder or similar) and trim it to Letter size 8 1/2" by 11". Turn the power off, remove Tray 2, and gently feed the manilla folder into the paper path for Tray 2. You are trying to knock loose any obstructions in the path, like bits of paper, staples. Insert that in and work it gently up and down. Reinstall Tray 2 and see if your manuevering cleared the error. If not, you should check the little black plastic sensor flag near the registration assembly, sits near the front middle, underneath the toner. Verify that tiny plastic sensor is in good working order and operates properly (it should have an attached spring and should move back and forth to the touch.)
If you don't find any actual paper jammed and the sensor seems to move freely, you should verify the fuser is correct by checking the part # on the fuser, see details below.
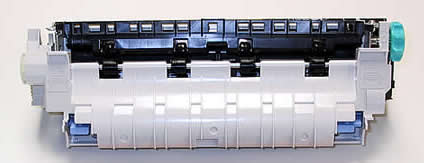
When you see this 13.20.00 error, you should verify you have the correct fuser installed for your model. HP makes 3 different fusers which look identical, but the 3 fusers are not interchangeable between printer models. The outside plastic and metal frame look the same, but the inner wiring is different. If the incorrect fuser is installed, you can get a 13.20.00 error (or a 50.5 error in some cases) when you power on the printer.
Fusers are a consumable part and are sold as part of a maintenance kit; it is expected over the life of the printer you will replace the fuser several times. HP estimates average fuser life to last between 150,000 to 200,000 pages; but a fuser can fail much earlier depending on printing conditions, heavy paper jams, and the quality of the fuser installed.
The best way to determine which fuser you have is to pull the fuser out of your printer and check the barcode label on the fuser. If you don't know how to remove the fuser from your printer,it's not difficult -- see the removal instructions farther down the page.
Once you have the fuser out, check the fuser's barcode label for the part # and see if the part # matches with your model printer.
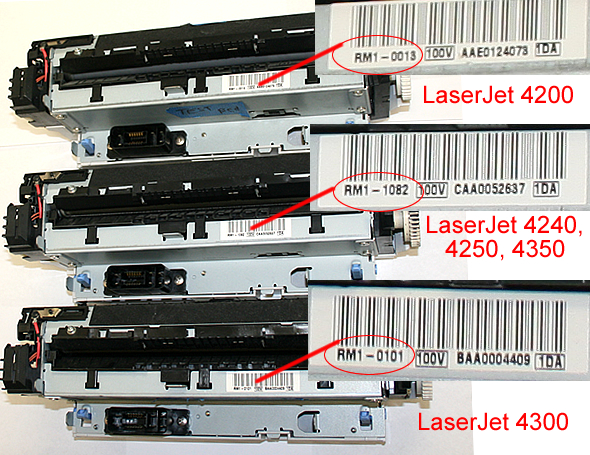
On the barcode you will find an HP part #, check the part# on your fuser to see if it matches in the list below. If the fuser part# does not match with your printer, you should order and install the correct fuser.
If you have any questions give us a call toll-free 866-352-7108 or local 608-831-2396, we can help you get the right fuser for your specific model.
part# RM1-0013 purchase HP 4200 fuser/maintenance kit here
for use in HP LaserJet 4200, HP LaserJet 4200N, HP LaserJet 4200TN, HP LaserJet 4200DTN, HP LaserJet 4200DTNs, HP LaserJet 4200DTNsl
part# RM1-1082 purchase HP 4240, 4250, 4350 fuser/maintenance kit here
for use in HP LaserJet 4240, HP LaserJet 4240N, HP LaserJet 4250, HP LaserJet 4250N, HP LaserJet 4250DN, HP LaserJet 4250TN, HP LaserJet 4250DTN, HP LaserJet 4250DTNsl
part# RM1-0101 purchase HP 4300 fuser/maintenance kit here
for use in HP LaserJet 4300, HP LaserJet 4300N, HP LaserJet 4300DN, HP LaserJet 4300TN, HP LaserJet 4300DTN, HP LaserJet 4300DTNs, HP LaserJet 4300DTNsl
Removal instructions: How to remove the fuser:
Turn the printer off and unplug the power cord. The fuser might be hot if you have been using the printer. As a safety precaution wait 30 minutes for the fuser to cool before proceeding.
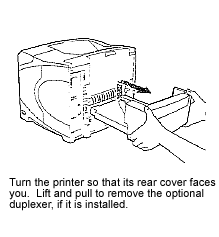
If a duplexer is installed, remove it from the back of the printer.
Next, lower the rear output bin cover as shown below.
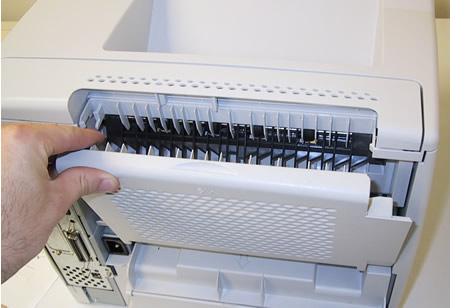
Flex the arms on the plastic output bin slightly to remove one side of the tray at a time. Set the output bin cover aside.
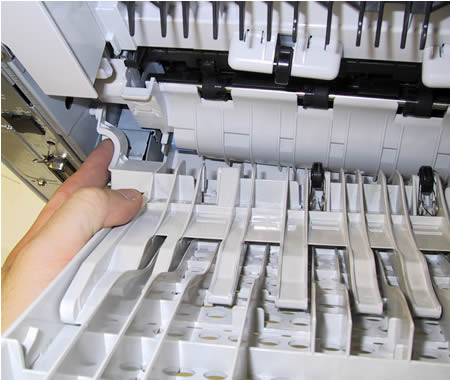
While grasping onto both sides of the fuser, push the blue levers upward and pull the fuser straight out.
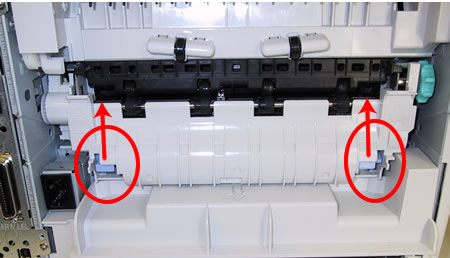
Install the replacement fuser by inserting it and aligning the left side first. Push the fuser firmly--listen for the sound of both blue levers clicking into place. If the fuser does not click into place you run the risk of wearing out both the fuser and the gears that drive the fuser prematurely. Re-install the plastic rear output bin.
Tech Support
Featured Articles

