
RM1-0043 Swing plate assembly with PrinterTechs metal gear
Product Description
Finally, a definitive solution for the swing plate problem in HP's 4200, 4300, 4250, 4350 series printers!

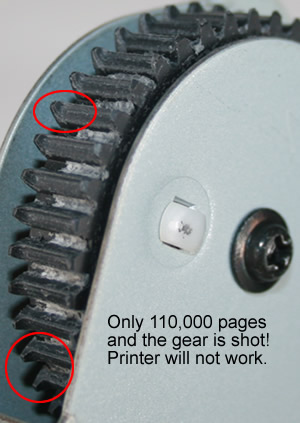
A common problem with these models is the relatively quick failure of the swing plate gear. This is the gear that drives the fusing assembly. It’s where “the rubber meets the road” so to speak between the printer's gear drive and the fuser. Check out the worn gear teeth in the picture on the left. When the teeth wear down the fuser won’t rotate properly. If the fuser won’t rotate you’ll hear grinding noises, get paper jams, see various error messages, and in general you probably won’t be very happy. We’ve seen the teeth on these gears worn to the point of failure in as little as 110,000 pages. That’s about half of the maintenance cycle! Hmmm, not good.
After almost a year of research and testing we have created a precision engineered brass gear with bearing, made right here in the USA.
This is an industry first and the only long term solution to fix the problematic swing plate issue inherent in the 42x0 and 43x0 series LaserJets.
A common question we get asked, Won't the metal gear wear out the plastic gears faster? No. Read the detailed article here. Over time, our metal gear causes LESS wear on the plastic gears, not more.
In most cases you will only need to replace the black swing plate gear with our metal gear. This is called the "short method" and it is a fairly easy install. Click below for instructions. Once in a while, the white gear hidden behind the black gear is worn out as well; in those cases you will have to do the long method of replacing the entire swing plate assembly (advanced installation).
Here are the instructions for the short method (replacing black gear with metal gear)
If both the black gear and the white gear are worn out, you’ll need to replace the entire swing plate assembly. (There are no shortcuts for replacing the white gear.) Fortunately the white gear doesn't wear out as often.
Keep in mind this "long method" is considered an advanced installation.
Here are the instructions for replacing the entire swing plate assembly.
Additional Information
| Alternate part numbers | RM1-0043, RM1-0043-060, RM1-0043-000, RM10043, RM1-0043-000CN |
|---|---|
| For use in the following printers: | HP LaserJet 4200, HP LaserJet 4200dtn, HP LaserJet 4200dtns, HP LaserJet 4200dtnsl, HP LaserJet 4200L, HP LaserJet 4200n, HP LaserJet 4200tn, HP LaserJet 4240, HP LaserJet 4240n, HP LaserJet 4250, HP LaserJet 4250dtn, HP LaserJet 4250dtnsl, HP LaserJet 4250n, HP LaserJet 4250tn, HP LaserJet 4300, HP LaserJet 4300dtn, HP LaserJet 4300dtns, HP LaserJet 4300dtnsl, HP LaserJet 4300n, HP LaserJet 4300tn, HP LaserJet 4345, HP LaserJet 4345MFP, HP LaserJet 4345x MFP, HP LaserJet 4345xm MFP, HP LaserJet 4345xs MFP, HP LaserJet 4350, HP LaserJet 4350dtn, HP LaserJet 4350dtnsl, HP LaserJet 4350n, HP LaserJet 4350tn, HP LaserJet M4345, HP LaserJet M4345MFP, HP LaserJet M4345x, HP LaserJet M4345xm, HP LaserJet M4345xs |
Related Items
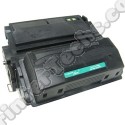
Universal High-Yield toner cartridge replaces Q5942X Q1338A Q1339A Q5945A for HP 4200 4250 4300 4345 4350 |
