
-
Home

-
Troubleshooting
- Causes of Light Print
Causes of Light Print for HP LaserJets
 This article discusses the ambiguity of the term "light print" and explains the five most common causes for light print:
1. toner cartridge
2. transfer roller
3. fuser
4. laser scanner mirror and lenses
5. electronic problems and power supply problems (rare)
We take a lot of technical support calls and one of the challenges is in interpreting how people describe print defects. What one person calls a smudge or fuzzy print, another calls light print, and another calls ghosted image. When diagnosing a print defect, it is always best if we have a scanned copy of the print defect; faxes don’t work very well because of the low resolution. If we can see the print defect and ask a few "process of elimination" questions, it makes it easier to narrow down the source of the problem. The following article covers the most common sources of light print in laser printers.
Common sources of light print:
1. Empty toner cartridge or defective toner cartridge.
An empty toner cartridge is by far the most common reason for light print and it amazes us how often people forget to swap toners to see if this is the problem. You may simply be out of toner. Don’t rely on the printer’s toner level indicators since they are not always accurate. You also may have a defective toner cartridge. There are a lot of poorly remanufactured toners being sold, so don’t be surprised if this is the cause of the problem. Even brand new Genuine HP toners are occasionally defective. For the record we still recommend quality remanufactured (compatible) toners, but that’s a different article.
If you have a color LaserJet you will have four toner cartridges instead of one which makes it a little harder to find which one is the problem. Some of the better color LaserJet have a feature to defeat the toner check when the printer starts up. This will allow you to print with less than four toners installed, or swap positions of the toners to help determine which one is bad through process of elimination.
2. Transfer roller - black and white printers
The transfer roller holds a charge that is opposite of that of the toner and helps transfer, or pull, the toner off of the cartridge’s photosensitive drum onto the paper. If the transfer roller is defective or positioned incorrectly you can get light print because all of the toner isn’t getting pulled off the drum.
You may have a bad transfer roller. Never use any kind of liquid to clean the transfer roller. If you must, blow it off or wipe it with a dry, lint-free cloth. Any liquids or solvents could change the electrical properties of the roller. Also, try to handle the transfer roller from the ends, as oils from your fingers could be detrimental to the surface of the transfer roller. Some people recommend using gloves when handling the transfer roller but unless you just ate a greasy pepperoni pizza, you should be fine. Make sure your hands are clean and try to minimize touching the surface of the transfer roller.
If the transfer roller isn’t seated properly or the clips that hold the transfer roller in place are broken you can get light print, especially on the side of the page where the transfer roller has too wide of a gap between it and the photo sensitive drum. Use the little blue hook tool that came with the transfer roller to remove it. If you use a screwdriver and try to pry the transfer roller out you risk breaking the tabs that hold the transfer roller collar in place. When the transfer roller is properly installed it should be flat and springy when you push down on the right and left side. If the tabs that hold the transfer roller are broken you have to replace the transfer assembly. This is a huge job. We recommend calling tech support to verify this is the problem or send the printer in for repair.
Also, if you had a printer shipped or just bought a printer and it was shipped to you, the transfer roller can pop out during shipping. We take measures to secure the transfer roller in shipping, but UPS & Fedex really bang boxes around in transit. The transfer roller can still pop out and we include instructions with our printers for re-installing the transfer roller if that occurs.
Transfer process for color LaserJets
Color LaserJets are a bit trickier to troubleshoot in regards to light print than black and white printers. The transfer process involves four toners instead of one. Most color LaserJets have a transfer belt (ITB) and some designs separate the photosensitive drum from the toner cartridges. If you have already eliminated defective toners as the source you may have to replace the transfer belt or imaging drum if your printer has one. With all of the variations in color LaserJet design, it’s hard to give specifics, but in general, transfer belts, sometimes called transfer assemblies, and imaging drums are consumable supply items and easy to replace.
3. Fuser
The fuser is the part of the printer that bonds toner to the paper through heat and pressure. Fusers DO NOT have a built in supply of toner, they only bond toner that is already on the paper. Therefore fusers can not cause light print, unless the toner is sticking to the fuser’s upper roller. If that happens you usually get a ghosted image of the print repeated down the page at an interval that is the circumference of the upper fuser roller. Another print defect we see from fusers is in the plastic sleeve designs, especially LaserJet 4200 series. If the sleeve tears, you’ll get smeared toner down the length of the page, often preceded by bits of plastic film coming out of the printer.
To check if the fuser is causing the problem you can replace the fuser (duh); if you don’t have a spare fuser handy you can try a Halfway Test, which is easiest on black and white printers, or you can remove the fuser and inspect the upper roller to see if toner is sticking to it.
A little more about fusers.
All fusers have a pressure roller, usually the lower roller in the fuser, and a roller that supplies the heat, usually the upper roller. In HP fusers, the upper roller can be an aluminum barrel with a heating element in the center, or a plastic or metallic sleeve that rotates around a ceramic heating element. The upper roller is in direct contact with the toner, melting it into the fibers of the paper. A nonstick coating on the upper roller prevents toner from sticking to it. As fusers start to wear, this nonstick coating wears down and you might find toner sticking to the upper fuser roller and then getting re-deposited further down the page as a repeated image (ghost image). Fusers are considered a supply item, like toner cartridges, except the have a longer life than toner cartridges.
4. Electronic and power supply problems
These are very rare and if you are not a technician we recommend sending the printer in for repair if you have eliminated all of the other possibilities, including dirty laser scanner assembly mirrors (next paragraph). It is possible that a high voltage power supply or engine control board is causing light print but it is very rare. Consult with tech support.
5. Laser scanner
The laser scanner assembly “writes” an image onto the photosensitive drum in the toner cartridge. Again color printers may do this a little differently than black and white printers but the concept is the same. If something blocks the laser from writing an image on the drum then you get no print or light print in the area of the obstruction. If the mirrors or lenses in the scanner assembly get dirty you’ll get light print. This usually manifests itself as light print on one side of the page. If you suspect the scanner needs cleaning you should have eliminated the toner, transfer roller, and fuser as possibilities because this is a time consuming procedure.
In black and white printers the scanner is located underneath the top cover. In general you’ll need to take the panels off the printer and the scanner is a black assembly with a yellow caution label. Color printers have more than one scanner because they have more than one toner cartridge. If you don’t know how to access the scanner assembly look it up in the service manual or send the printer in for repair. After you have removed the scanner you can clean the optics. Cleaning the mirror is not discussed in the service manuals, see our general guide below.
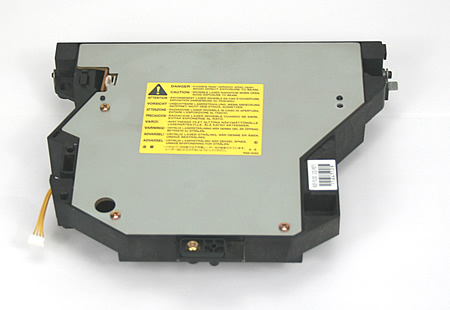
Here is a picture of a printer's laser scanner assembly -- probably its most distinguishing mark is the bright yellow "CAUTION" label which warns not to open the laser scanner assembly while the printer is in operation or while connected to a power source.
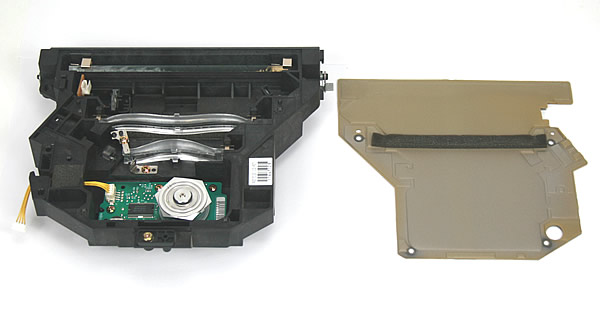
Here is a picture of the laser scanner assembly with the cover removed. Inside you will notice the long clear plastic lenses and the long thin mirror. When dust and toner particles work their way into the scanner assembly, the mirror and lenses might get dirty. The result is that the laser beam cannot reflect properly onto the toner cartridge drum, and you will get areas of light print.
To clean the laser scanner assembly, remove the scanner cover. Blow the dust out with compressed air if you have it, then follow up with a dry Q-tip to gently wipe down the mirror. We don't recommend any liquids as they may leave a residue.

Re-assemble the printer in the reverse order that you took it apart.
Causes of Light Print for HP LaserJets
This article discusses the ambiguity of the term "light print" and explains the five most common causes for light print:
1. toner cartridge
2. transfer roller
3. fuser
4. laser scanner mirror and lenses
5. electronic problems and power supply problems (rare)
We take a lot of technical support calls and one of the challenges is in interpreting how people describe print defects. What one person calls a smudge or fuzzy print, another calls light print, and another calls ghosted image. When diagnosing a print defect, it is always best if we have a scanned copy of the print defect; faxes don’t work very well because of the low resolution. If we can see the print defect and ask a few "process of elimination" questions, it makes it easier to narrow down the source of the problem. The following article covers the most common sources of light print in laser printers.
Common sources of light print:
1. Empty toner cartridge or defective toner cartridge.
An empty toner cartridge is by far the most common reason for light print and it amazes us how often people forget to swap toners to see if this is the problem. You may simply be out of toner. Don’t rely on the printer’s toner level indicators since they are not always accurate. You also may have a defective toner cartridge. There are a lot of poorly remanufactured toners being sold, so don’t be surprised if this is the cause of the problem. Even brand new Genuine HP toners are occasionally defective. For the record we still recommend quality remanufactured (compatible) toners, but that’s a different article.
If you have a color LaserJet you will have four toner cartridges instead of one which makes it a little harder to find which one is the problem. Some of the better color LaserJet have a feature to defeat the toner check when the printer starts up. This will allow you to print with less than four toners installed, or swap positions of the toners to help determine which one is bad through process of elimination.
2. Transfer roller - black and white printers
The transfer roller holds a charge that is opposite of that of the toner and helps transfer, or pull, the toner off of the cartridge’s photosensitive drum onto the paper. If the transfer roller is defective or positioned incorrectly you can get light print because all of the toner isn’t getting pulled off the drum.
You may have a bad transfer roller. Never use any kind of liquid to clean the transfer roller. If you must, blow it off or wipe it with a dry, lint-free cloth. Any liquids or solvents could change the electrical properties of the roller. Also, try to handle the transfer roller from the ends, as oils from your fingers could be detrimental to the surface of the transfer roller. Some people recommend using gloves when handling the transfer roller but unless you just ate a greasy pepperoni pizza, you should be fine. Make sure your hands are clean and try to minimize touching the surface of the transfer roller.
If the transfer roller isn’t seated properly or the clips that hold the transfer roller in place are broken you can get light print, especially on the side of the page where the transfer roller has too wide of a gap between it and the photo sensitive drum. Use the little blue hook tool that came with the transfer roller to remove it. If you use a screwdriver and try to pry the transfer roller out you risk breaking the tabs that hold the transfer roller collar in place. When the transfer roller is properly installed it should be flat and springy when you push down on the right and left side. If the tabs that hold the transfer roller are broken you have to replace the transfer assembly. This is a huge job. We recommend calling tech support to verify this is the problem or send the printer in for repair.
Also, if you had a printer shipped or just bought a printer and it was shipped to you, the transfer roller can pop out during shipping. We take measures to secure the transfer roller in shipping, but UPS & Fedex really bang boxes around in transit. The transfer roller can still pop out and we include instructions with our printers for re-installing the transfer roller if that occurs.
Transfer process for color LaserJets
Color LaserJets are a bit trickier to troubleshoot in regards to light print than black and white printers. The transfer process involves four toners instead of one. Most color LaserJets have a transfer belt (ITB) and some designs separate the photosensitive drum from the toner cartridges. If you have already eliminated defective toners as the source you may have to replace the transfer belt or imaging drum if your printer has one. With all of the variations in color LaserJet design, it’s hard to give specifics, but in general, transfer belts, sometimes called transfer assemblies, and imaging drums are consumable supply items and easy to replace.
3. Fuser
The fuser is the part of the printer that bonds toner to the paper through heat and pressure. Fusers DO NOT have a built in supply of toner, they only bond toner that is already on the paper. Therefore fusers can not cause light print, unless the toner is sticking to the fuser’s upper roller. If that happens you usually get a ghosted image of the print repeated down the page at an interval that is the circumference of the upper fuser roller. Another print defect we see from fusers is in the plastic sleeve designs, especially LaserJet 4200 series. If the sleeve tears, you’ll get smeared toner down the length of the page, often preceded by bits of plastic film coming out of the printer.
To check if the fuser is causing the problem you can replace the fuser (duh); if you don’t have a spare fuser handy you can try a Halfway Test, which is easiest on black and white printers, or you can remove the fuser and inspect the upper roller to see if toner is sticking to it.
A little more about fusers.
All fusers have a pressure roller, usually the lower roller in the fuser, and a roller that supplies the heat, usually the upper roller. In HP fusers, the upper roller can be an aluminum barrel with a heating element in the center, or a plastic or metallic sleeve that rotates around a ceramic heating element. The upper roller is in direct contact with the toner, melting it into the fibers of the paper. A nonstick coating on the upper roller prevents toner from sticking to it. As fusers start to wear, this nonstick coating wears down and you might find toner sticking to the upper fuser roller and then getting re-deposited further down the page as a repeated image (ghost image). Fusers are considered a supply item, like toner cartridges, except the have a longer life than toner cartridges.
4. Electronic and power supply problems
These are very rare and if you are not a technician we recommend sending the printer in for repair if you have eliminated all of the other possibilities, including dirty laser scanner assembly mirrors (next paragraph). It is possible that a high voltage power supply or engine control board is causing light print but it is very rare. Consult with tech support.
5. Laser scanner
The laser scanner assembly “writes” an image onto the photosensitive drum in the toner cartridge. Again color printers may do this a little differently than black and white printers but the concept is the same. If something blocks the laser from writing an image on the drum then you get no print or light print in the area of the obstruction. If the mirrors or lenses in the scanner assembly get dirty you’ll get light print. This usually manifests itself as light print on one side of the page. If you suspect the scanner needs cleaning you should have eliminated the toner, transfer roller, and fuser as possibilities because this is a time consuming procedure.
In black and white printers the scanner is located underneath the top cover. In general you’ll need to take the panels off the printer and the scanner is a black assembly with a yellow caution label. Color printers have more than one scanner because they have more than one toner cartridge. If you don’t know how to access the scanner assembly look it up in the service manual or send the printer in for repair. After you have removed the scanner you can clean the optics. Cleaning the mirror is not discussed in the service manuals, see our general guide below.
Here is a picture of a printer's laser scanner assembly -- probably its most distinguishing mark is the bright yellow "CAUTION" label which warns not to open the laser scanner assembly while the printer is in operation or while connected to a power source.
Here is a picture of the laser scanner assembly with the cover removed. Inside you will notice the long clear plastic lenses and the long thin mirror. When dust and toner particles work their way into the scanner assembly, the mirror and lenses might get dirty. The result is that the laser beam cannot reflect properly onto the toner cartridge drum, and you will get areas of light print.
To clean the laser scanner assembly, remove the scanner cover. Blow the dust out with compressed air if you have it, then follow up with a dry Q-tip to gently wipe down the mirror. We don't recommend any liquids as they may leave a residue.
Re-assemble the printer in the reverse order that you took it apart.
Tech Support
Featured Articles

