HP LaserJet 1300 transfer roller installation instructions

Although the concept is simple, the transfer roller is extremely difficult to remove & replace. Good hand-eye coordination and patience will be required. As you're replacing the roller, avoid touching the black sponge portion of the transfer roller--instead handle the roller by its tips.
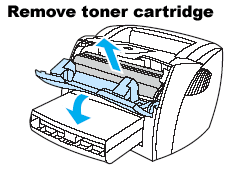
First, open the toner cartridge door and remove the toner cartridge as illustrated below.

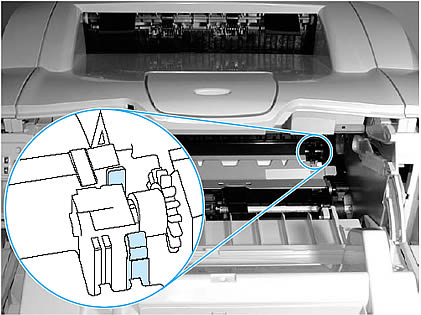
Use your fingers or use needle nose pliers to gently squeeze together the two small tabs near the right end of the transfer roller (pictured in blue below).

Lift the transfer roller up, slide it to the right, and lift it out of the printer. Do not misplace the small grounding spring that sits underneath the right side of the transfer roller.
Install the new transfer roller, lining up the small grounding spring on the right side and securing the locking tabs in place.
Other Steps in HP LaserJet 1300
- HP LaserJet 1300 transfer roller installation instructions
- HP LaserJet 1300 pickup roller installation instructions
- HP LaserJet 1300 separation pad installation instructions
- HP LaserJet 1300 fuser installation instructions


