HP LaserJet 2400 Tray 2 , Tray 3 separation pad installation instructions
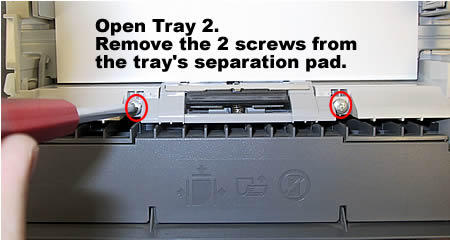
To replace the Tray 2 separation pad, open Tray 2 and remove the 2 screws which hold the separation pad in place.

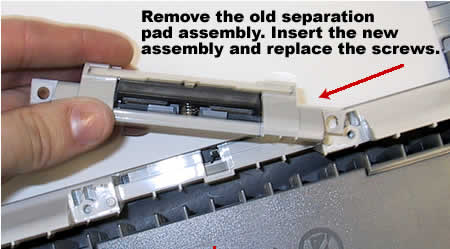
Next, remove the separation pad assembly, and replace it with the new assembly. Re-tighten the two screws.

Tray 3 Separation Pad
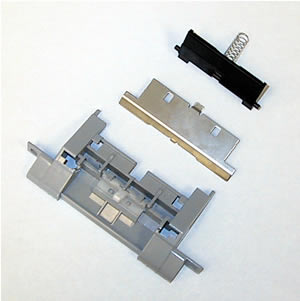
If you have the optional lower cassette Tray 3, replacing the separation pad requires extra disassembly. You will need to swap out the new black rubber separation pad from its new frame into the old frame, rather than just replacing the entire frame (because Tray 3 has a larger separation pad frame than the standard separation pad frame).
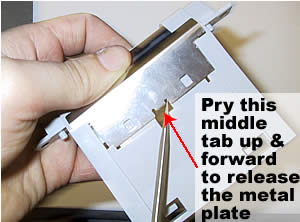
| 1. Begin by releasing and removing the metal plate as shown below by prying the tab near the bottom of the metal plate. Remove the metal plate to access the black separation pad. | 2. Next remove the old black separation pad. Disassemble the new frame in similar fashion, and transfer the new black separation pad onto the old frame. |
 |
 |
Reassemble the old Tray 3 frame, with the new black separation pad.
Other Steps in HP LaserJet 2400 2410 2420 2430
- HP LaserJet 2400 transfer roller installation instructions
- HP LaserJet 2400 Tray 2 Tray 3 Pickup roller installation instructions
- HP LaserJet 2400 fuser installation instructions
- HP LaserJet 2400 fuser drive gear installation instructions
- HP LaserJet 2400 Tray 1 Pickup roller , separation pad installation instructions
- HP LaserJet 2400 Tray 2 Tray 3 Separation pad installation instructions
- HP LaserJet 2400 Resetting the maintenance count


