
-
Home

-
Maintenance Kit Instructions
-
HP LaserJet 9000 9040 9050
- HP LaserJet 9000 9040 9050 transfer roller installation instructions
HP LaserJet 9000 , 9040 , 9050 transfer roller installation instructions

Installing the transfer roller.
![]()
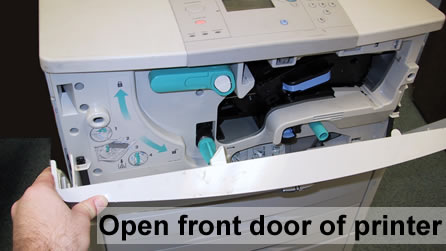
With the printer facing toward you, open the front cover.
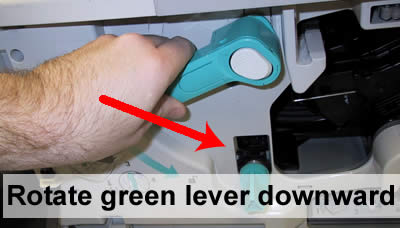
Rotate the large green lever downward.
Next, press and hold the light blue tab on the transfer roller assembly, and slide the assembly out of the printer.

Next you must free the transfer roller itself from its black plastic assembly. To free the roller from its assembly, pry both metal ends of the roller bar up and free from the clasps.
![]()
The metal plate is still attached to the roller. Pry both metal tips of the roller bar up and free from the holding clasps attached to the metal plate.
![]()
When handling the replacement transfer roller be careful to hold it by its metal tips, not touching the black roller surface. Oils from your skin can adversely affect print quality.
First lock the new transfer roller into its corresponding clasps on the metal plate. Then lock the new transfer roller with the metal plate into the corresponding clasps on the black plastic assembly. Finally, slide the entire assembly back into the printer.
Press the white button on the large green lever and rotate the lever upward until it locks in place. Do not force the lever--if it doesn't rotate easily, check the transfer roller assembly to be sure it is properly seated.
Other Steps in HP LaserJet 9000, 9040, 9050
- HP LaserJet 9000 9040 9050 fuser installation instructions
- HP LaserJet 9000 9040 9050 transfer roller installation instructions
- HP LaserJet 9000 9040 9050 Cassette rollers installation instructions
- HP LaserJet 9000 9040 9050 Tray 1 pickup roller and separation pad installation instructions
- HP LaserJet 9000 9040 9050 Reset the maintenance count
Tech Support
Featured Articles

