HP LaserJet P3005 fuser drive gear installation instructions
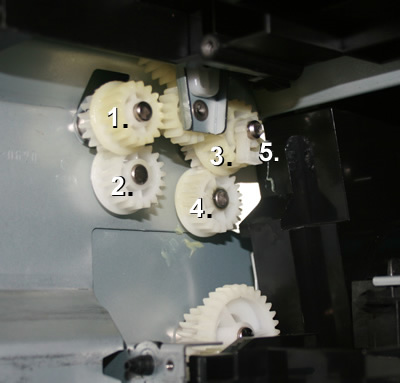
These 4 drive gears (labeled “1”, “2”, “3” and “4”) are not included with a standard maintenance kit. These gears sit just behind the fuser, at the back of the printer.
If you replace the P3005 fuser and you hear a gear noise, you probably need to replace these gears. The new gears on the fuser may not mesh well with the worn gears in your printer. These gears wear out fairly quickly in the P3005 series printers. Click here to order the set of gears or you can call us at 866-352-7108.
Installing the fuser drive gears.
With the fuser removed, look into the printer and locate the cluster of drive gears on the left side of the printer cavity (see picture below).

Use a flathead screwdriver to pry the release tab on gear 1, and then remove the gear by sliding it off its metal bar.
Gear 2 has no holding tab so it will just slide off its shaft once gear 1 is removed.

Remove the holding tab (labeled #5 in the first picture above), then slide off gears #3 & #4.
 |
 |
Install the new gears in reverse order of the steps above, secure gears #3 and #4 by re-installing the same locking tab.
Other Steps in HP LaserJet P3005
- HP LaserJet P3005 transfer roller installation instructions
- HP LaserJet P3005 Tray 2 Pickup roller installation instructions
- HP LaserJet P3005 Tray 2 separation pad installation instructions
- HP LaserJet P3005 Tray 1 pickup roller , separation pad installation instructions
- HP LaserJet P3005 fuser installation instructions
- HP LaserJet P3005 fuser drive gear installation instructions
- HP LaserJet P3005 Resetting the maintenance count


