Replacing the Transfer Belt (ITB, Transfer Kit) HP Color LaserJet CP5225 CP5525 M750 M755

You need to replace the Transfer Belt (also called ITB or Transfer Kit) when the message "REPLACE TRANSFER KIT" displays on the control panel. You may also need to replace the Transfer Belt prior to that message, if you are experiencing print quality issues that aren't resolved by replacing the toner or by performing Calibrations. If you aren't sure what you need to replace, give us a call @ 866-352-7108.
Replacing the Transfer Belt (ITB, Transfer Kit) HP Color LaserJet CP5225 CP5525 M750 M755
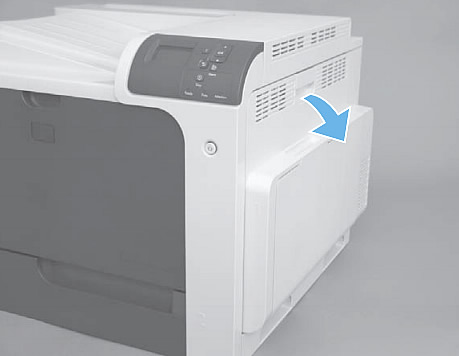
1. Open the printer's right side door
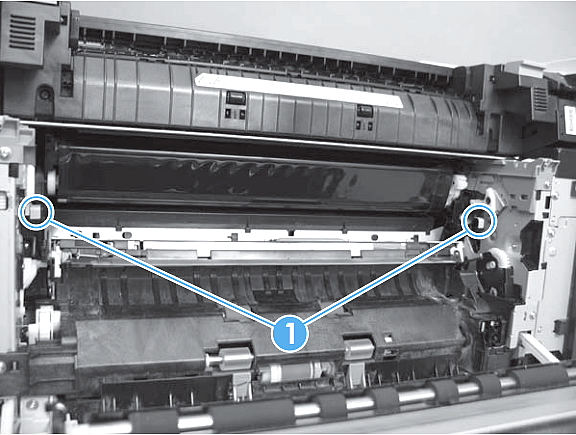
2. Use both hands to grasp the blue levers (circled as callout 1 in picture below), apply slight downward pressure, and pull the transfer belt assembly toward you at a downward angle.
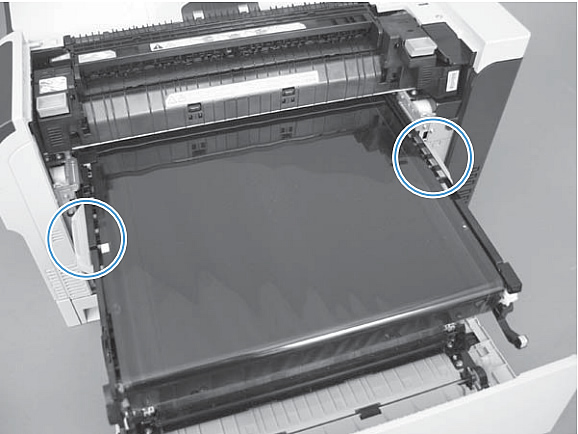
3. Grasp the small handles on the transfer belt assembly (circled in blue in picture below), and begin gently pulling the assembly out towards you, until a set of 2 larger handles pop free on the sides of the transfer belt assembly.
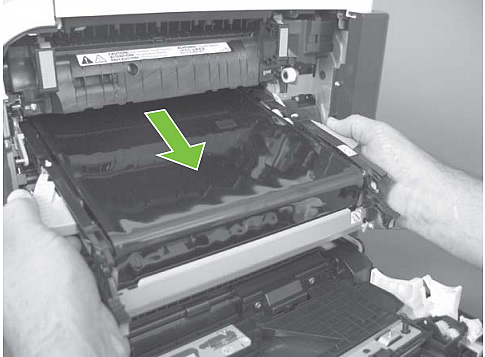
4. Now grasp the larger handles on the transfer belt assembly, and continue pulling the transfer belt straight out of the printer until it is completely removed.
5. Avoid touching the surface of the new transfer belt. Install in reverse order, sliding it securely into the machine.
6. Now you can reset the New Transfer Kit setting ... At the control Panel, press the Home button. Open the "Administration" menu, then choose "Manage Supplies". Select the "Rest Supplies" option, and then choose "New Transfer Kit." Use the Down Arrow button to highlight the word "Yes", and then press Ok to select it.
6. After replacing the Transfer Belt, it's a good idea to perform a Full Calibration (or even several Full Calibrations in a row, if you are having print quality issues). Full Calibrations help with print quality by aligning the color tones, the drums, and the color plane. Each Full Calibration takes about 4 minutes. To perform a Full Calibration: Press Home button to enter the menus. Press Down Arrow to highlight SYSTEM SETUP and press OK. Press Down Arrow to highlight PRINT QUALITY and press OK. Press Down Arrow to highlight COLOR CALIBRATION and press OK. Next, choose CALIBRATE NOW and press OK. Wait for the printer to calibrate (usually takes 4 minutes or so), and then print a test page. If print quality still needs improvement, repeat the Calibration. If multiple Calibrations don't help, some of the toner cartridges may need replacement.
7. If you purchased your transfer belt assembly at the exchange price, don't forget to send back your used transfer belt core to PrinterTechs. Re-use the same packaging for safe shipping.