
-
Home

-
Maintenance Kit Instructions
-
HP LaserJet 4240 4250
- HP LaserJet 4240 , 4250 fuser installation instructions
HP LaserJet 4240 , 4250 fuser installation instructions

Installing the fuser.
Turn the printer off and unplug the power cord. The fuser might be hot if you have been using the printer. As a safety precaution wait 30 minutes for the fuser to cool before proceeding.
If a duplexer is installed, remove it from the back of the printer.
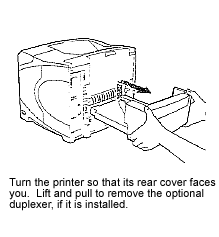
Next, lower the rear output bin cover as shown below.
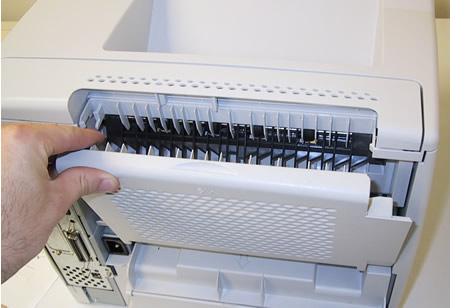
Flex the arms on the plastic output bin slightly to remove one side of the tray at a time. Set the output bin cover aside.
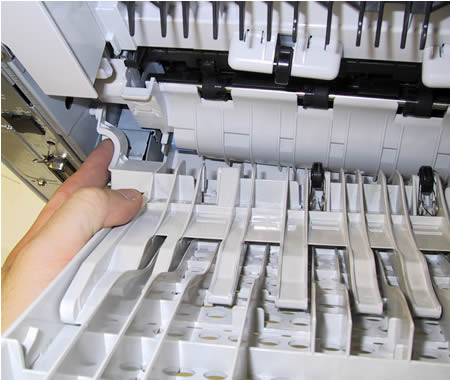
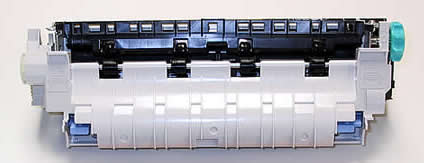
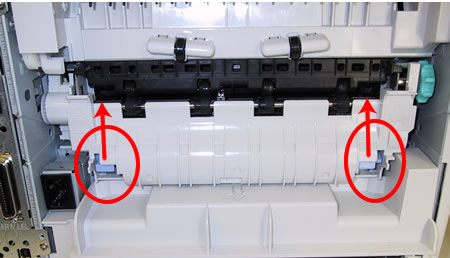
While grasping onto both sides of the fuser, push the blue levers upward and pull the fuser straight out.
Install the replacement fuser by inserting it and aligning the left side first. Push the fuser firmly--listen for the sound of both blue levers clicking into place. If the fuser does not click into place you run the risk of wearing out both the fuser and the gears that drive the fuser prematurely. Re-install the plastic rear output bin.
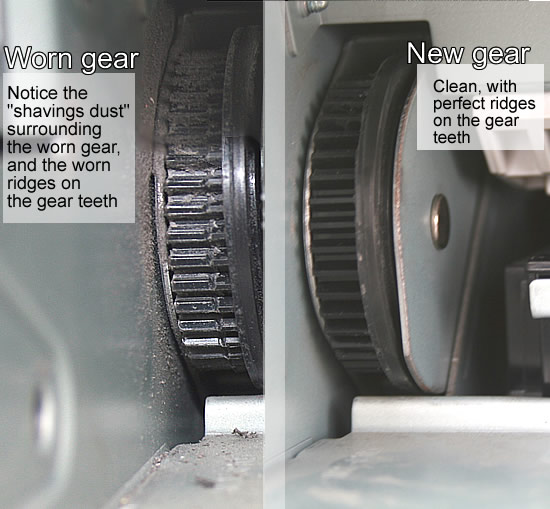
Important Note: After you install your new fuser, you may hear excessive gear noise if the printer's Swing Plate Drive Gear is worn out. The new gears on the new fuser may not mesh well with worn-out drive gears in your printer, causing grinding or rumbling noises. The most common culprit is the black plastic swing plate gear pictured below. This gear is a high failure rate part. So if you install a new fuser, and you begin hearing a grinding noise, you'll want to examine your swing plate drive gear for wear and tear.
The picture below compares a worn plastic drive gear side-by-side with a new gear. Look for powdery black plastic shavings around the gear, and worn ridges on the gear teeth. You may need a flashlight and it can be hard to see that the teeth are worn without a new gear for comparison. This is such a common problem that we have developed a metal gear as a replacement.
It takes less drive-gear wear than you would think to cause noisy printing with a new fuser. If you want more information on our metal replacement gear and how to fix this problem, click here.
That's it for the fuser install! Remember to send your fuser back to us if you purchased your maintenance kit on exchange. Ship it back in the box we sent if you still have it.
Other Steps in HP LaserJet 4240 , 4250
- HP LaserJet 4240 , 4250 fuser installation instructions
- HP LaserJet 4240 , 4250 transfer roller installation instructions
- HP LaserJet 4240 , 4250 tray 1 pickup roller installation instructions
- HP LaserJet 4240 , 4250 tray 1 separation pad installation instructions
- HP LaserJet 4240 , 4250 cassette pickup, feed, and separation roller installation instructions
- HP LaserJet 4240 , 4250 reset maintenance count instructions
Tech Support
Featured Articles

