
-
Home

-
Maintenance Kit Instructions
-
HP LaserJet 5si
- HP LaserJet 5si fuser installation instructions
HP LaserJet 5si fuser installation instructions

Installing the fuser.
Turn the printer off and unplug the power cord. The fuser might be hot if you have been using the printer. As a safety precaution wait 20 minutes for the fuser to cool before proceeding.
Facing the printer open the left door. If a duplex unit is installed, remove it by pushing down on the green tab and slide it out.
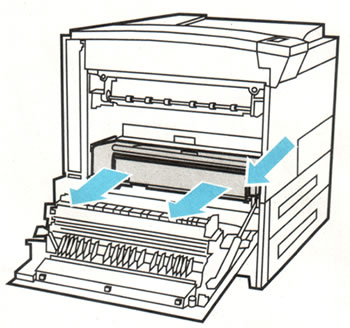
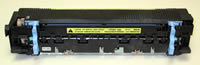
If you purchased a new fuser (instead of a rebuilt fuser). There will most likely be two orange packing spacers that need to be removed as shown below.
![]()
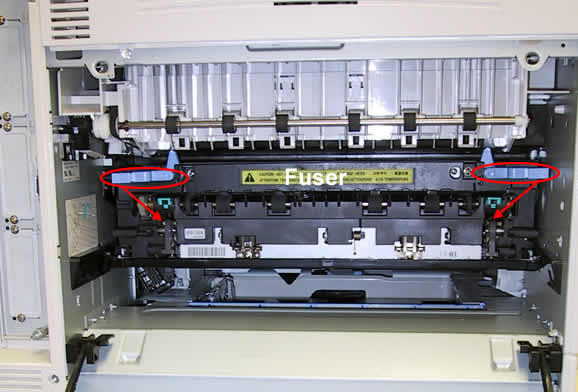
The picture below shows the fuser. The two large blue levers circled below release the fuser. Rotate the levers down and pull the fuser straight out. You will need to lift up slightly as you pull the fuser out so it clears the lip of the printer's supporting frame.
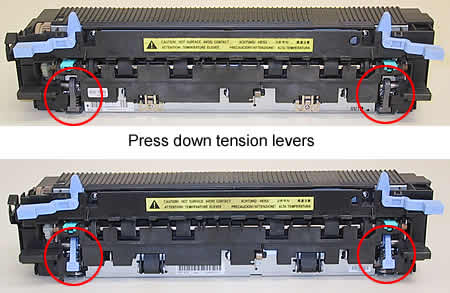
Take the replacement fuser and press the tension levers into the down position. The fuser ships with the tension levers in the up position. Press them down before installing the fuser. They can be gray or blue in color.
Slide the replacement fuser into the printer making sure you push it in over the lip of the frame. In other words, the fuser is seated only when it is pushed in all the way and the bottom edge of the fuser clears the frame. Rotate the blue levers up to lock the fuser into place. If the levers don't rotate easily you didn't push the fuser in far enough. You will break the levers on the fuser if the fuser isn't seated and you try to force the levers up.
Re-install the duplexer if you have one.
That's it for the fuser! Remember to send your fuser back to us if you purchased your maintenance kit on exchange. Ship it back in the box we sent if you still have it.
Other Steps in HP LaserJet 5si
Tech Support
Featured Articles

