
-
Home

-
Maintenance Kit Instructions
-
HP LaserJet 9000 9040 9050
- HP LaserJet 9000 9040 9050 fuser installation instructions
HP LaserJet 9000 9040 9050 fuser installation instructions

Installing the fuser.

Turn the printer off and unplug the power cord. The fuser might be hot if you have been using the printer. As a safety precaution wait 30 minutes for the fuser to cool before proceeding.
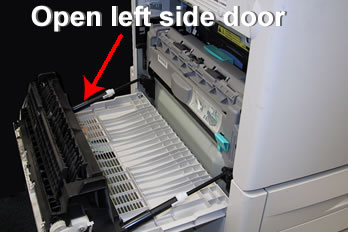
To access the fuser, open the left side door.
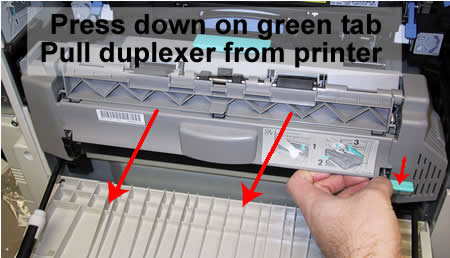
If a duplexer is installed (shown below), remove it from the back of the printer. To remove the duplexer, press down on the green lever and pull the duplexer out of the printer.
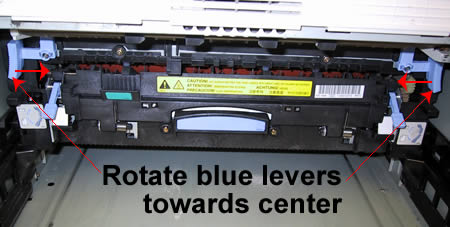
Next, rotate the two blue levers at the top of both sides of the fuser towards the center of the machine.
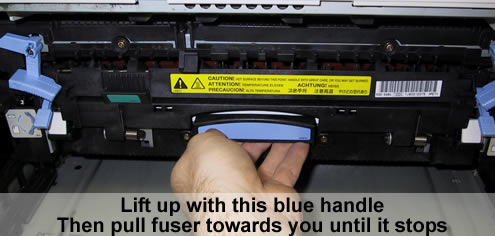
With the blue levers "unlocked," lift up slightly on the blue finger handle (shown below) and pull the fuser away from the printer until the fuser catches and stops.
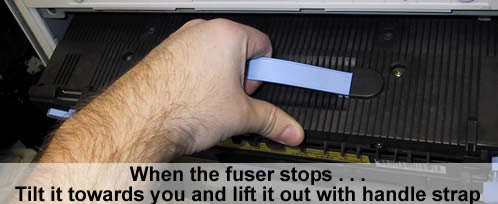
When the fuser catches and stops, tilt the fuser towards you and lift it up and away from the printer using the blue strap handle. The fuser is deceptively heavy, don't drop it.
Now install the new fuser; slide it back in place and when it is secure, lock the blue levers at the top of the fuser back in place. Reinstall the duplexer if it was installed.
That's it for the fuser! Remember to send your fuser back to us if you purchased your maintenance kit on exchange. Ship it back in the box we sent if you still have it.
Other Steps in HP LaserJet 9000, 9040, 9050
- HP LaserJet 9000 9040 9050 fuser installation instructions
- HP LaserJet 9000 9040 9050 transfer roller installation instructions
- HP LaserJet 9000 9040 9050 Cassette rollers installation instructions
- HP LaserJet 9000 9040 9050 Tray 1 pickup roller and separation pad installation instructions
- HP LaserJet 9000 9040 9050 Reset the maintenance count
Tech Support
Featured Articles

