HP LaserJet 5si transfer roller installation instructions
Installing the transfer roller.

Turn the printer off and unplug the power cord.
Note: HP recommends wearing latex gloves when handling the transfer roller to prevent getting skin oils on the rubber. This is not necessary if you are careful to touch only the ends of the roller.
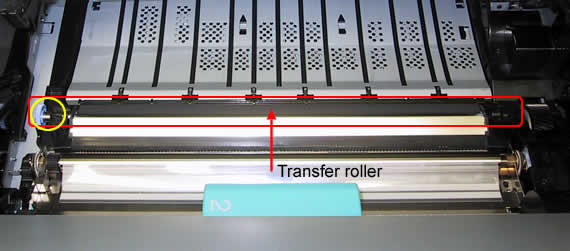
Open the top door and remove the toner cartridge. Grab the blue gear at the left end of the transfer roller (circled in yellow) and pull up an inch or two. This will pull up the entire "transfer guide assembly". Slide the transfer guide assembly to the left to release the shaft on the right side.

Below is a picture of the "transfer guide assembly" which includes the transfer roller and the black plastic and metal transfer guide.

Pictured above is the top view, below the bottom view. Notice the three snaps circled in red.

Remove the transfer roller from the transfer guide and snap in the new roller.
Reinstalling the transfer guide assembly: Place the shaft of the transfer roller in the hole on the right. Press the left end of the shaft down into the retaining clip. Now press down on the shiny metallic part of the transfer guide to make sure the three snaps circled above snap into place. If the transfer guide is not seated, you will get paper jams.


