HP LaserJet 4, 4M transfer roller installation instructions
A NOTE about Transfer rollers
This installation step is obsolete, proceed to the next step in the instructions. -- Good transfer rollers are simply not being made anymore. The genuine HP transfer roller has been discontinued, and literally every aftermarket transfer roller we tested from various Chinese manufacturers caused print defects. If your old transfer roller ever gets dirty to the point of leaving print defects (rare), you can clean it by blowing the transfer roller off with canned air, and/or gently rubbing away the excess toner using a dry lint-free cloth.
Installing the transfer roller.

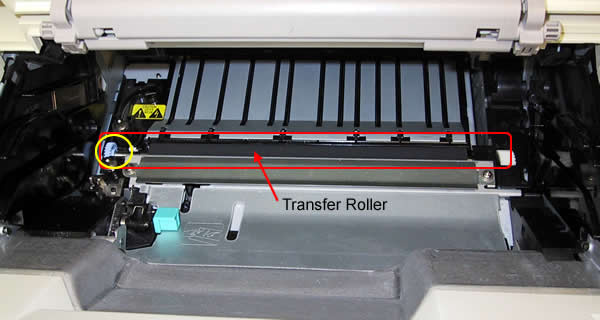
With the printer facing toward you, open the top cover and remove the toner cartridge. Use a small flat-head screwdriver to pry up the left side of the transfer roller (yellow circle below). Pull the right side of the transfer roller out of the right slot and discard the used roller.

Be careful not to touch the black spongy rubber on the new roller. Skin oils can degrade print quality. Install the new roller in the reverse fashion (insert right metal tip of the roller in first, then press the left side (gear side) of the roller to lock it down.
Other Steps in HP LaserJet 4, 4M
- HP LaserJet 4, 4m fuser installation instructions
- HP LaserJet 4, 4m transfer roller installation instructions
- HP LaserJet 4, 4m Tray 1 pickup roller , separation pad installation instructions
- HP LaserJet 4, 4m cassette pickup roller installation instructions
- HP LaserJet 4, 4m optional cassette pickup roller installation instructions


